
Replacing a faulty oxygen (O₂) sensor can be expensive, with diagnostic fees often adding significantly to the repair cost. However, with a little knowledge and the right tools, you can test your O₂ sensor yourself, potentially saving yourself a considerable amount of money. This guide will walk you through the process, enabling you to determine if your O₂ sensor needs replacing before heading to a mechanic.
- Understanding the Oxygen Sensor
- Symptoms of a Bad O₂ Sensor
- Testing Your O₂ Sensor: The Voltmeter Method
- Step 1: Locate the O₂ Sensor
- Step 2: Disconnect the Sensor
- Step 3: Connect the Multimeter
- Step 4: Start the Engine and Monitor Voltage
- Step 5: Interpreting the Results
- When to Seek Professional Help
- Beyond the Voltmeter: Visual Inspection and Other Tests
- Replacing the O₂ Sensor
- Safety Precautions
- Understanding O2 Sensor Types
- Troubleshooting Common Issues
- Beyond DIY: When Professional Help is Necessary
- Cost Savings and Long-Term Benefits
Understanding the Oxygen Sensor
The O₂ sensor is a crucial component in your vehicle’s emission control system. It’s located in the exhaust manifold and measures the amount of oxygen in the exhaust gases. This information is fed back to the engine’s computer (ECU), which adjusts the air-fuel mixture for optimal combustion and reduced emissions. A faulty O₂ sensor can lead to poor fuel economy, rough idling, and a failing emissions test.
Symptoms of a Bad O₂ Sensor
Before testing, it’s helpful to identify potential symptoms. These include:
- Check Engine Light illuminated: This is often the first sign of a problem, accompanied by a diagnostic trouble code (DTC).
- Reduced fuel economy: A faulty sensor can lead to a richer or leaner than optimal air-fuel mixture.
- Rough idling or hesitation: Inconsistent fuel delivery due to sensor malfunction can cause rough running.
- Black smoke from exhaust: This indicates a rich air-fuel mixture, often caused by a faulty sensor.
- Failed emissions test: A malfunctioning O₂ sensor will likely result in failing emissions standards.
Testing Your O₂ Sensor: The Voltmeter Method
This method requires a multimeter capable of measuring DC voltage. Always disconnect the negative battery terminal before starting any work.
Step 1: Locate the O₂ Sensor
Consult your vehicle’s repair manual to pinpoint the location of your O₂ sensor(s). They are usually found in the exhaust manifold, close to the engine.
Step 2: Disconnect the Sensor
Carefully disconnect the electrical connector from the O₂ sensor. Be gentle to avoid damaging the connector.
Step 3: Connect the Multimeter
Set your multimeter to measure DC voltage. Connect the positive lead (+) to the sensor’s signal wire and the negative lead (-) to a good ground point on the engine block.
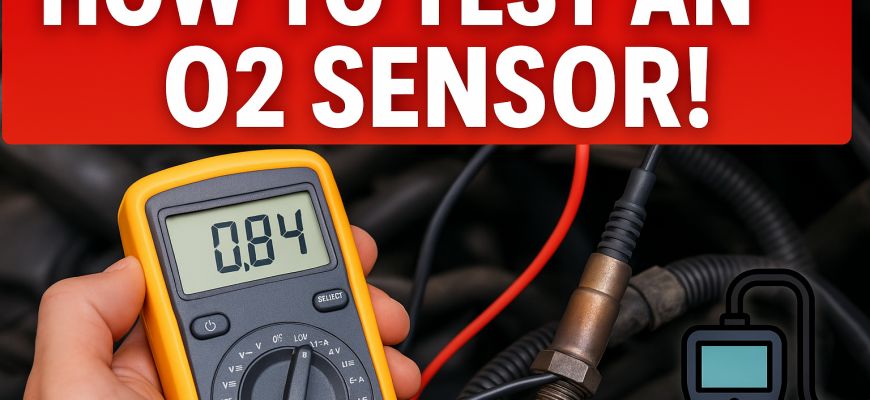
Step 4: Start the Engine and Monitor Voltage
Start the engine and let it warm up to operating temperature. Observe the voltage reading on your multimeter. A properly functioning O₂ sensor will show a fluctuating voltage between approximately 0.1 and 0.9 volts. The voltage should swing relatively quickly between these values.
Step 5: Interpreting the Results
- Fluctuating voltage (0.1-0.9V): This indicates a functioning O₂ sensor.
- Steady voltage near 0V or 1V: This suggests a faulty sensor.
- No voltage: Could indicate a wiring problem or a completely dead sensor.
When to Seek Professional Help
While this guide provides a basic method for testing your O₂ sensor, it’s crucial to remember that some problems require professional expertise. If you are uncomfortable working on your vehicle, or if you are unable to resolve the issue after testing, consult a qualified mechanic.
This self-diagnostic approach can save you money, but always prioritize safety and proper procedures. Remember to consult your vehicle’s repair manual for specific details and safety precautions.
Beyond the Voltmeter: Visual Inspection and Other Tests
While the voltmeter test is a good starting point, a thorough diagnosis often involves more than just voltage readings. A visual inspection of the sensor itself can reveal potential problems:
- Physical Damage: Check the sensor for cracks, breakage, or corrosion. A damaged sensor housing can compromise its functionality.
- Contamination: Inspect the sensor for excessive oil or dirt buildup. This can interfere with accurate readings.
- Wiring: Examine the wiring harness connecting to the sensor for any signs of damage, fraying, or loose connections. A faulty wire can mimic a bad sensor.
Advanced Testing (For Experienced DIYers): More sophisticated diagnostic tools can provide a more comprehensive assessment. These include:
- OBD-II Scanner with Live Data: A capable OBD-II scanner can display real-time sensor data, allowing you to observe the sensor’s output under various driving conditions. This provides a more dynamic assessment than a simple voltmeter reading.
- Oscilloscope: For a truly in-depth analysis, an oscilloscope can reveal the precise waveform of the sensor’s output, providing detailed information about its response time and overall health. This is generally only necessary for experienced technicians.
Replacing the O₂ Sensor
If your tests confirm a faulty sensor, replacing it is often a straightforward task. However, it’s vital to:
- Consult your vehicle’s repair manual: This will provide specific instructions and torque specifications for your vehicle’s model and year.
- Use the correct replacement sensor: Ensure you purchase an O₂ sensor that is specifically designed for your vehicle. Using the wrong sensor can lead to further problems.
- Apply anti-seize compound: Apply a thin layer of anti-seize compound to the threads of the new sensor to prevent seizing during future replacements.
- Tighten to the correct torque: Over-tightening can damage the sensor or the exhaust manifold. Under-tightening can lead to leaks.
- Clear the trouble code: After installing the new sensor, use your OBD-II scanner to clear any stored trouble codes.
Safety Precautions
Remember, working on your vehicle’s exhaust system involves exposure to hot surfaces and potentially harmful gases. Always:
- Allow the engine to cool completely before attempting any repairs.
- Work in a well-ventilated area.
- Use appropriate safety equipment, including gloves and eye protection.
By following these steps and exercising caution, you can effectively test your O₂ sensor and potentially save on expensive diagnostic fees. However, if you are unsure about any part of this process, it’s always best to seek professional assistance.
Understanding O2 Sensor Types
Before you begin testing, it’s helpful to understand the different types of O2 sensors. There are primarily two types:
- Heated O2 Sensors: These sensors have a built-in heater that accelerates their response time, allowing them to operate efficiently even before the exhaust system reaches operating temperature. They are more common in modern vehicles.
- Non-Heated O2 Sensors: These sensors rely on the exhaust system’s heat to reach operating temperature. They are less common in newer vehicles.
The testing procedure may vary slightly depending on the type of sensor you have. Consult your vehicle’s repair manual for specific details regarding your sensor.
Troubleshooting Common Issues
If your tests reveal a problem, it’s important to systematically troubleshoot the issue. A faulty reading doesn’t always mean a bad sensor. Here are some potential problems:
- Wiring Problems: Check for broken, frayed, or corroded wires in the sensor’s harness. A simple visual inspection can often reveal the problem.
- Loose Connections: Ensure that all connectors are securely fastened. A loose connection can interrupt the signal and lead to incorrect readings.
- Faulty ECU: In rare cases, a faulty engine control unit (ECU) can cause incorrect readings. This requires more advanced diagnostics.
- Exhaust Leaks: Leaks in the exhaust system can affect the accuracy of the O2 sensor’s readings. Inspect the exhaust system for any visible leaks.
- Contaminated Sensor: Fuel contamination or other deposits on the sensor’s tip can affect its performance. Cleaning the sensor tip (carefully!) might resolve the issue in some cases.
Beyond DIY: When Professional Help is Necessary
While many car owners can successfully test and replace their O2 sensors, some situations warrant professional assistance:
- Complex Diagnostic Trouble Codes (DTCs): Multiple DTCs or codes that are difficult to interpret often require professional diagnostic equipment and expertise.
- Intermittent Problems: If the problem is intermittent and difficult to reproduce consistently, professional diagnostics can help pinpoint the root cause.
- Advanced Diagnostic Tools: Accessing and interpreting data from advanced diagnostic tools often requires specialized training and equipment.
- Lack of Experience or Confidence: If you’re uncomfortable working on your vehicle’s exhaust system, it’s always best to seek professional help to avoid potential damage or injury.
Cost Savings and Long-Term Benefits
Learning to diagnose and repair your own vehicle can lead to significant cost savings over time. Replacing an O2 sensor yourself can be substantially cheaper than paying for professional diagnosis and repair. Furthermore, understanding your vehicle’s systems better can empower you to proactively maintain its health and longevity. A properly functioning O2 sensor contributes to better fuel efficiency, reduced emissions, and improved engine performance – all benefiting both your wallet and the environment.
This information is provided for educational purposes only and should not be considered professional automotive advice. Always consult your vehicle’s repair manual and exercise caution when working on your vehicle. Improper repairs can result in damage to your vehicle or personal injury. If you are unsure about any step, seek the assistance of a qualified automotive technician.


Clear, concise, and practical. I like how the article focuses on a specific testing method rather than overwhelming the reader with multiple options. Highly recommended.
This is a very helpful guide for anyone wanting to troubleshoot their oxygen sensor. The step-by-step instructions are clear and easy to follow, even for someone with limited mechanical experience.
This article is a lifesaver! Saved me a potential fortune on mechanic fees. The diagrams (if any were included in the original article) would have been a great addition, but the text was sufficient.
A well-written guide that empowers car owners to diagnose potential issues themselves. The information is presented in an accessible way, making it easy to understand even for non-mechanics.
This is a fantastic guide for DIY car repair. The step-by-step instructions are easy to follow, and the explanations are clear and concise. I feel confident I could now test my own O2 sensor.
Great article! I appreciated the emphasis on safety (disconnecting the battery) and the clear explanation of why the oxygen sensor is important. The voltmeter method is well-explained.
Excellent resource! The inclusion of common symptoms before diving into the testing procedure was really useful. This helped me understand if my car even needed testing.