
The valve cover gasket is a crucial component of your vehicle’s engine, playing a vital role in maintaining proper function and performance. Over time, this gasket can wear out, leading to oil leaks and potential engine damage. Understanding the cost associated with its replacement can help you budget effectively and make informed decisions. Below, we break down the costs involved in replacing a valve cover gasket.
- 1. What is a Valve Cover Gasket?
- 2. Symptoms of a Failing Valve Cover Gasket
- 3. Cost Breakdown
- a. Parts Costs
- b. Labor Costs
- c. Total Estimated Cost
- 4. Factors Influencing Cost
- 5. DIY vs. Professional Replacement
- 6. Conclusion
- 7. Preventive Measures
- 8. When to Seek Professional Help
- 9. Conclusion: A Wise Investment
- 1. Preparation for Replacement
- 2. The Replacement Process
- a. Remove the Engine Cover (if applicable)
- b. Disconnect Relevant Components
- c. Unscrew the Valve Cover
- d. Remove the Old Gasket
- e. Clean the Surface
- f. Install the New Gasket
- g. Reattach the Valve Cover
- h. Reconnect Components
- i. Test for Leaks
- 3. The Importance of Professional Help
- 4. Final Thoughts
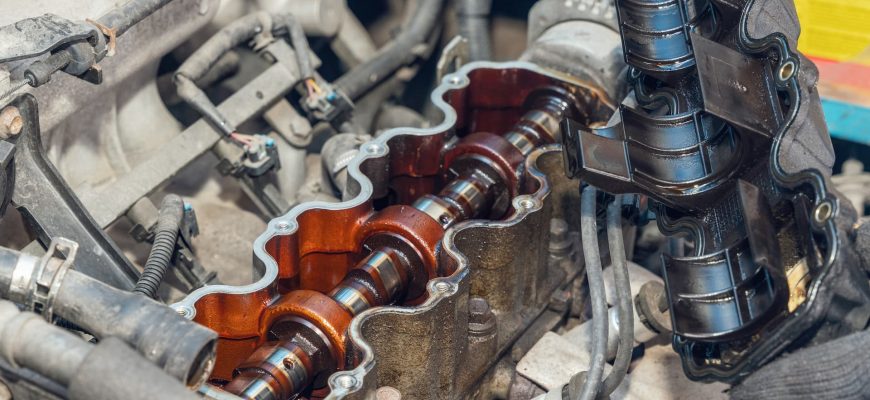
1. What is a Valve Cover Gasket?
The valve cover gasket seals the joint between the valve cover and the engine block. It prevents oil from leaking out and contaminants from entering the engine. A faulty gasket can lead to oil leaks, which can cause a variety of issues, including engine overheating and damage to other components.
2. Symptoms of a Failing Valve Cover Gasket
Recognizing the signs of a failing valve cover gasket is crucial for timely replacement. Common symptoms include:
- Oil leaks around the valve cover area
- Burning oil smell
- Engine misfires due to oil entering the combustion chamber
- Increased engine noise
3. Cost Breakdown
The cost of replacing a valve cover gasket can vary widely depending on several factors, including the make and model of your vehicle, labor rates, and whether you choose OEM or aftermarket parts. Here’s a detailed breakdown:
a. Parts Costs
- Valve Cover Gasket: $20 ⏤ $100
- Valve Cover Bolts (if needed): $10 ⏤ $30
- Sealant (if required): $5 — $15
b. Labor Costs
Labor costs typically range from $75 to $150 per hour. The time required for the replacement can vary:
- Simple Engine Layouts: 1-2 hours
- Complex Engine Layouts: 2-4 hours
c. Total Estimated Cost
Taking into account the parts and labor, the total cost for valve cover gasket replacement can range from:
- Low-End Estimate: $100 — $300
- High-End Estimate: $300 — $600
4. Factors Influencing Cost
Several factors can influence the final cost of the replacement:
- Vehicle Make and Model: Luxury or specialty vehicles may incur higher costs.
- Location: Labor rates can vary significantly by region.
- Mechanic’s Reputation: Established mechanics may charge more for their expertise.
- Additional Repairs: If other issues are discovered during the replacement, costs can increase.
5. DIY vs. Professional Replacement
For those with mechanical skills, replacing a valve cover gasket can be a DIY project, saving on labor costs. However, if you are unfamiliar with engine work, hiring a professional is advisable to avoid potential complications.
6. Conclusion
Replacing a valve cover gasket is essential for maintaining your vehicle’s engine health. Understanding the cost breakdown can help you prepare and make the best decision for your situation. Whether you opt for a DIY approach or professional assistance, addressing gasket issues promptly will ensure your engine runs smoothly and efficiently.
Remember, regular maintenance and timely replacements can save you from more extensive repairs down the road!
7. Preventive Measures
To extend the life of your valve cover gasket and avoid premature replacement, consider the following preventive measures:
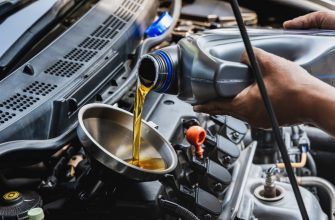
- Regular Maintenance: Adhering to your vehicle’s maintenance schedule can help identify issues before they escalate. Regular oil changes, fluid checks, and engine inspections are essential.
- Quality Fluids: Using high-quality engine oil and adhering to the manufacturer’s specifications can minimize wear on engine components, including the gasket.
- Monitor Engine Temperature: Keeping an eye on your engine’s temperature gauge can help detect overheating issues early, preventing damage to the gasket and other engine components.
- Check for Debris: Ensure that the area around the valve cover is clean and free of debris that could compromise the gasket seal.
8. When to Seek Professional Help
While some car enthusiasts may feel comfortable tackling a valve cover gasket replacement themselves, there are instances when professional assistance is warranted:
- Complex Engine Designs: If your vehicle has a more complicated engine layout, such as a V6 or V8 with multiple components to remove, it may be best to consult a professional.
- Warranty Considerations: If your vehicle is still under warranty, having repairs performed by a certified mechanic can help ensure that your warranty remains intact.
- Time Constraints: If you’re short on time or tools, enlisting a professional can save you the hassle and ensure the job is done efficiently.
9. Conclusion: A Wise Investment
Replacing a valve cover gasket is not merely a maintenance task; it’s an investment in the longevity and reliability of your vehicle; With costs that vary based on multiple factors, understanding the breakdown can empower you to make the right decision. Whether opting for a DIY approach or seeking professional help, addressing gasket issues promptly can prevent more severe mechanical failures down the line. In the world of automotive care, a stitch in time truly saves nine!
If you notice any signs of a failing valve cover gasket, don’t hesitate to get it checked. Your engine will thank you for it!
Replacing a valve cover gasket might seem like a daunting task, but understanding the process can demystify it. Here’s a closer look at what goes into this essential maintenance job, ensuring your engine remains in prime condition without breaking the bank.
1. Preparation for Replacement
Before diving into the replacement, preparation is key. Gather all necessary tools, including:
- Socket set
- Torque wrench
- Screwdrivers
- Gasket scraper or razor blade
- Cleaning supplies (degreaser, rags)
Additionally, ensure you have the right replacement gasket for your specific vehicle make and model. It’s crucial to consult your vehicle’s service manual to understand the exact steps required for your engine layout.
2. The Replacement Process
Here’s a step-by-step guide to replacing the valve cover gasket:
a. Remove the Engine Cover (if applicable)
Some vehicles have an engine cover that must be removed to access the valve cover. Use the appropriate tools to unfasten it.
b. Disconnect Relevant Components
You may need to disconnect various components, such as ignition coils, hoses, or wiring harnesses, to gain full access to the valve cover. Labeling these components can prevent confusion during reinstallation.
c. Unscrew the Valve Cover
Using a socket wrench, carefully unbolt the valve cover. It’s advisable to keep the bolts organized, as they may vary in size and length.
d. Remove the Old Gasket
Carefully peel away the old gasket from the valve cover and engine block. Ensure all remnants are removed to prevent leaks with the new gasket. A gasket scraper can help with this task.
e. Clean the Surface
Thoroughly clean the mating surfaces on both the valve cover and the engine block. This step is essential for a proper seal and can prevent future leaks.
f. Install the New Gasket
Place the new gasket onto the valve cover, ensuring it fits snugly into the designated grooves. If your vehicle requires sealant, apply it as per the manufacturer’s instructions.
g. Reattach the Valve Cover
Carefully position the valve cover back onto the engine block. Hand-tighten the bolts in a crisscross pattern to ensure even pressure distribution. Then, use a torque wrench to tighten them to the manufacturer’s specifications.
h. Reconnect Components
Reattach any components you disconnected earlier. Double-check that everything is securely fastened and properly connected.
i. Test for Leaks
After reassembling, run your engine for a few minutes and check for any signs of leaks. Keep an eye on the oil level and monitor the engine’s performance for the next few days.
3. The Importance of Professional Help
While many car enthusiasts may feel confident in tackling a valve cover gasket replacement, there are times when seeking professional help is a wise choice. If the task feels overwhelming or if you encounter unexpected challenges during the process, enlisting the expertise of a qualified mechanic can save you time and ensure the job is done correctly. Mechanics have the experience and tools to handle any complications that may arise, making the investment worthwhile.
4. Final Thoughts
Replacing the valve cover gasket is a vital maintenance task that can prevent significant engine issues down the road. By understanding the replacement process and the associated costs, you can make informed decisions about your vehicle maintenance. Whether you choose to DIY or seek professional assistance, timely gasket replacement ensures your engine remains healthy, efficient, and leak-free.
Armed with this knowledge, you’re now better prepared to face the challenges of valve cover gasket replacement, ensuring your vehicle continues to run smoothly for years to come.


Great insights on the symptoms of a failing valve cover gasket. I learned a lot and will keep an eye out for these signs.
Fantastic article! It’s great to have such detailed information at hand when dealing with car repairs. Highly recommended!
This article provides a clear and concise explanation of the valve cover gasket and its importance. Very informative!
The explanation of labor costs was very helpful! Now I know what to expect when getting my car serviced.
I appreciated the detailed cost breakdown! It really helps in budgeting for maintenance. Thank you for this valuable information.