
In the world of automotive diagnostics, understanding how to test your vehicle’s oxygen (O2) sensor is essential for maintaining peak performance and emissions control. The O2 sensor plays a critical role in your car’s engine management system, influencing fuel efficiency and exhaust emissions. If you’re experiencing issues like poor fuel economy or a check engine light, your O2 sensor might be the culprit. In this guide, we will walk you through the steps to test an O2 sensor using a multimeter.
- What is an O2 Sensor?
- Tools Required
- Step-by-Step Guide to Testing an O2 Sensor
- 1. Preparation
- 2. Disconnect the O2 Sensor
- 3. Set Up Your Multimeter
- 4. Test the O2 Sensor
- 5. Observe the Readings
- 6. Additional Resistance Test
- Interpreting the Results
- Understanding the Types of O2 Sensors
- Advanced Testing Techniques
- 1. Oscilloscope Testing
- 2. Temperature Check
- 3. Fuel Trim Analysis
- Common Issues and Troubleshooting
What is an O2 Sensor?
An oxygen sensor is a vital component located in the exhaust system of your vehicle. It measures the amount of unburned oxygen in the exhaust gases. This data helps the engine control unit (ECU) adjust the air-fuel mixture for optimal combustion. Typically, vehicles are equipped with either a single or multiple O2 sensors, depending on the engine configuration.
Tools Required
Before diving into the testing process, gather the following tools:
- Digital Multimeter: A quality multimeter is essential for measuring voltage and resistance.
- Wrench Set: To disconnect the O2 sensor from the exhaust system.
- Safety Gloves: To protect your hands while working.
- Safety Glasses: To shield your eyes from debris.
Step-by-Step Guide to Testing an O2 Sensor
1. Preparation
Start by ensuring your vehicle is turned off and cooled down. This will prevent burns and ensure safety while you work. Locate the O2 sensor, which is typically found in the exhaust manifold or downstream in the exhaust system.
2. Disconnect the O2 Sensor
Using your wrench set, carefully disconnect the electrical connector from the O2 sensor. Be cautious not to damage the connector or wiring.
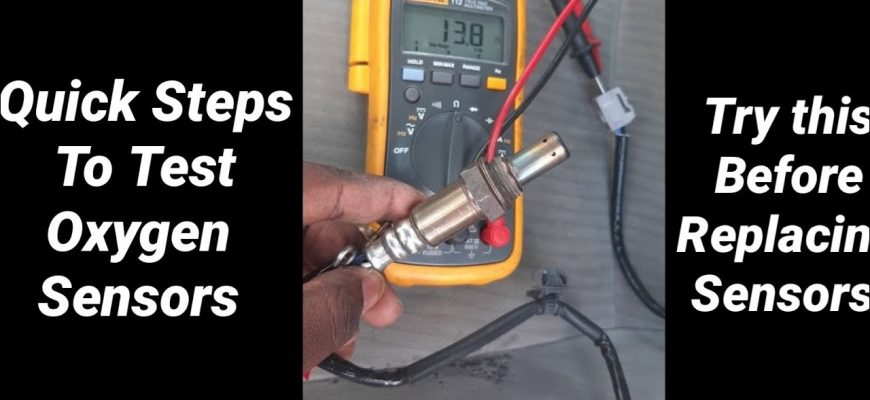
3. Set Up Your Multimeter
Turn on your digital multimeter and set it to measure voltage. Most O2 sensors operate within a voltage range of 0 to 1 volts. Make sure your multimeter probes are properly connected.
4. Test the O2 Sensor
With the multimeter set up, connect the positive probe to the O2 sensor signal wire (usually indicated in the vehicle’s service manual) and the negative probe to a good ground point on the vehicle. Start the engine and allow it to reach operating temperature.
5. Observe the Readings
As the engine runs, observe the voltage readings on the multimeter. A functioning O2 sensor should fluctuate between 0.1 to 0.9 volts. If the voltage stays constant (either too low or too high), the sensor may be faulty.
6. Additional Resistance Test
To further confirm the sensor’s condition, you can measure the resistance across the sensor terminals. Disconnect the sensor again and set your multimeter to measure resistance (ohms). The resistance should typically fall within the manufacturer’s specifications, which can be found in the service manual.
Interpreting the Results
After performing the tests, if your readings indicate fluctuations between 0.1 and 0.9 volts, your O2 sensor is likely functioning correctly. However, if you encounter steady readings or out-of-spec resistance, it may be time to replace the O2 sensor.
Testing your O2 sensor with a multimeter is a straightforward process that can save you both time and money in diagnosing issues within your vehicle’s engine management system. Regular checks of your O2 sensor can lead to improved fuel efficiency, reduced emissions, and a more reliable vehicle. If you’re unsure or uncomfortable performing these tests, it’s always wise to consult a professional mechanic.
By taking the initiative to understand and test your O2 sensor, you’re not only ensuring your vehicle runs smoothly but also contributing to a cleaner environment. Happy testing!
Having established the fundamental steps for testing your O2 sensor with a multimeter, let’s delve deeper into advanced diagnostic techniques that can further aid in ensuring your sensor is functioning optimally. These methods are particularly useful for seasoned DIYers and automotive enthusiasts who want to go beyond the basics.
Understanding the Types of O2 Sensors
Before performing any advanced tests, it is crucial to understand the different types of O2 sensors commonly found in vehicles:
- Wideband O2 Sensors: These sensors provide more precise readings across a broader range of air-fuel mixtures, which is essential for modern vehicles with sophisticated engine management systems.
- Narrowband O2 Sensors: These are the traditional sensors that measure the oxygen level in a binary fashion – rich or lean – and typically output a voltage between 0.1 and 0.9 volts.
Knowing which type you’re dealing with will help you understand the expected behavior and voltage ranges during testing.
Advanced Testing Techniques
1. Oscilloscope Testing
For advanced users, using an oscilloscope provides a more detailed view of the O2 sensor’s performance. This tool can illustrate the waveform of the voltage output, allowing you to identify patterns or anomalies that a multimeter might miss. Look for:
- Waveform Shape: A healthy sensor should show a rapid fluctuation, indicating it can respond to changes in the exhaust gases effectively.
- Response Time: Monitor how quickly the waveform reacts to changes in engine load or RPMs. A sluggish response could signify a failing sensor.
2. Temperature Check
O2 sensors operate optimally at high temperatures. If you suspect your sensor is not responding correctly, check its temperature using an infrared thermometer. A properly functioning O2 sensor should be hot enough to produce reliable readings, usually around 600°F (316°C) or more. If the sensor isn’t reaching this temperature, it could indicate a problem with the sensor itself or the exhaust system.
3. Fuel Trim Analysis
Another advanced technique involves analyzing the fuel trim data from your vehicle’s ECU. By using an OBD-II scanner, you can access live data and fuel trim readings, which can shed light on the O2 sensor’s performance:
- Short-Term Fuel Trim (STFT): This value fluctuates rapidly in response to O2 sensor data, indicating how the ECU is adjusting the fuel mixture.
- Long-Term Fuel Trim (LTFT): This provides insight into how the ECU has adjusted fuel delivery over time based on historical data, reflecting the overall health of the O2 sensor and fuel system.
Common Issues and Troubleshooting
While testing, you may encounter specific issues that could signify problems beyond just the O2 sensor itself. Here’s a quick guide to some common symptoms and their potential causes:
- High Fuel Consumption: Could indicate a faulty O2 sensor, but also check for vacuum leaks or fuel injector problems.
- Rough Idle: If the O2 sensor is stuck in one position, it might cause erratic fuel trims, leading to poor idle quality.
- Check Engine Light: Always start with reading the fault codes. An O2 sensor-related code doesn’t always mean the sensor is faulty; it could be an issue elsewhere in the engine management system.
Testing your O2 sensor isn’t just about checking voltages; it’s about understanding the intricate dance between various components of your vehicle’s engine management system. With these advanced techniques, you can diagnose issues more effectively and ensure your vehicle runs smoothly.
Remember, a well-functioning O2 sensor is crucial for maintaining optimal fuel efficiency and reducing harmful emissions. Whether you’re a professional mechanic or a dedicated DIY enthusiast, mastering these testing methods will empower you to keep your vehicle—and the environment—healthy.
As you continue your journey in automotive maintenance, always stay curious and informed. The world of car diagnostics is ever-evolving, and your proactive approach will not only save you money but also enhance your understanding of your vehicle’s performance.


This article is a lifesaver! The step-by-step approach demystified the process of testing an O2 sensor. I’m looking forward to improving my car’s performance!
This article provides a clear and concise guide on testing an O2 sensor! I found the step-by-step instructions very helpful. Great resource for DIY car maintenance!
Fantastic guide! The way it explains the function of the O2 sensor made everything click for me. I’m excited to try this out on my own car!
The detailed breakdown of tools needed really helped me prepare for the task. I appreciate the safety tips as well—always important when working on cars!
I never knew how crucial the O2 sensor was until reading this. The explanation was easy to understand, and now I feel more confident in maintaining my vehicle!
I loved how straightforward this guide is. It makes testing an O2 sensor seem manageable, even for a beginner like me. Highly recommend it to fellow car enthusiasts!
Very informative article! I had no idea how to test my O2 sensor before, but now I feel equipped with all the right knowledge and tools. Thanks for sharing!